How to integrate Notion and ChatGPT (without coding)

If you’re looking for an easy way to create a Notion ChatGPT integration, you’ve come to the right place.
In this article, I’ll show you how to use the power of ChatGPT to automate anything you want in Notion. We’ll go over examples of what you can automate with these two tools, and then I’ll show you a real example that we’ll build together, step by step.
Alright, let’s get into it.
Can Notion integrate with ChatGPT?
Yes, Notion can integrate with ChatGPT. However, you need to use an AI automation framework to bridge the gap between them. To do this, you can sign up for a free account on Gumloop and integrate your Notion account with any model of OpenAI’s ChatGPT.
The integration process is straightforward: you'll authenticate both your Notion account and create a Gumloop account. Gumloop pays for all the GPT models you can use. You then build flows that define how information moves between the two platforms. This no-code approach means anyone can create advanced automations without having to code.
Here are some ideas of what you can do with a Notion and ChatGPT integration:
- Automatically generate meeting notes summaries from raw transcripts
- Transform research data into structured knowledge-base articles
- Summarize long Notion documents into executive briefs
- Convert customer feedback into actionable insights and tasks
- Generate social media content from Notion blog drafts
- Create executive summaries from long-form content
- Analyze and categorize incoming information automatically
This is just the beginning. You can do a lot more. You’ll also get the best results when you stack this on with other tools you may already be using — like Outlook, Slack, Google Calendar, and more.
Now, let’s go over how to set up an automated workflow that leverages both Notion and ChatGPT.
5 steps to set up a Notion ChatGPT integration
Here’s how to set up a Notion ChatGPT integration:
- Use an AI automation framework
- Connect your Notion account
- Create a workflow with Notion and ChatGPT
- Test the integration
- Optimize your ChatGPT prompts
Let’s go over each step in depth.
1. Use an AI automation framework
The first step to creating a Notion ChatGPT integration is to connect it with an AI automation platform that allows you to create an automated workflow via prompting ChatGPT and using Notion’s API.
Luckily, Gumloop can do this for you without you having to write a single line of code. With Gumloop, you can integrate any tool in your tech stack with any modern LLM on the market. Together, you can create an AI workflow that lets you create your own AI agents.
It’s like having the powers of an AI Engineer without having to learn how to code like one. The great thing about Gumloop is that it’s free to start using — so you can follow this guide and set up your first automation without having to pull out your credit card.
The first step is to open up Gumloop and get familiar with the tool. In Gumloop, you have three core elements:
- Nodes: These are elements, like software tools and LLMs, that you can drag onto your canvas.
- Flows: These are connections you make between each of your elements to create an AI-automated workflow.
- Subflows: These are Flows within Flows. You can make smaller AI-automated workflows that are saved and reused within larger AI-automated workflows.
You can watch this short video to learn more about how it all works together:
Alright, now that we have a general overview of how Gumloop works, let’s have a use case on what we want to do with Notion and ChatGPT for the remainder of this article.
In this case, let's create an automated task generator based on emails we receive. For example, we can integrate Outlook or Gmail with Gumloop and have it use ChatGPT to return back a structured task in Notion whenever we receive specific emails.
Okay, let’s go on to the next step.
2. Connect your Notion account
Now that we know what we want to create, let’s go into Gumloop and drag the Notion Node onto our canvas.
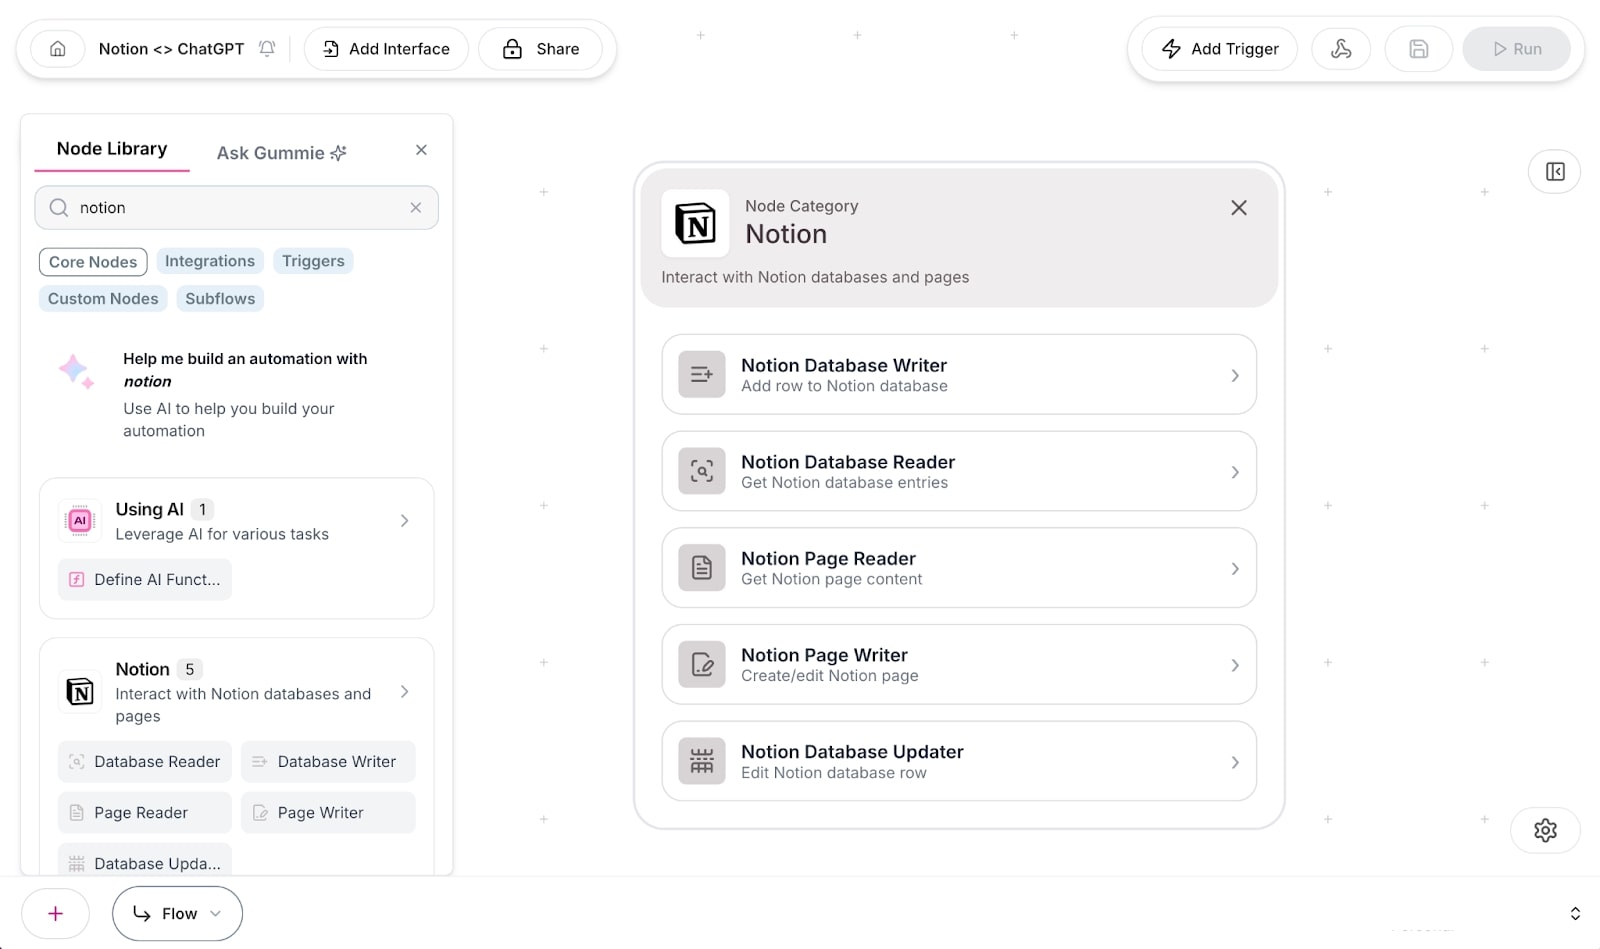
As you can see, there are many different things you can do with Notion within Gumloop. In this case, we are going to use the Notion Database Writer to add new rows to a Notion database.
Once you add the Notion Database Writer, you’ll be prompted to sign in with Notion. From there, Notion will ask you what pages you want to give access to.
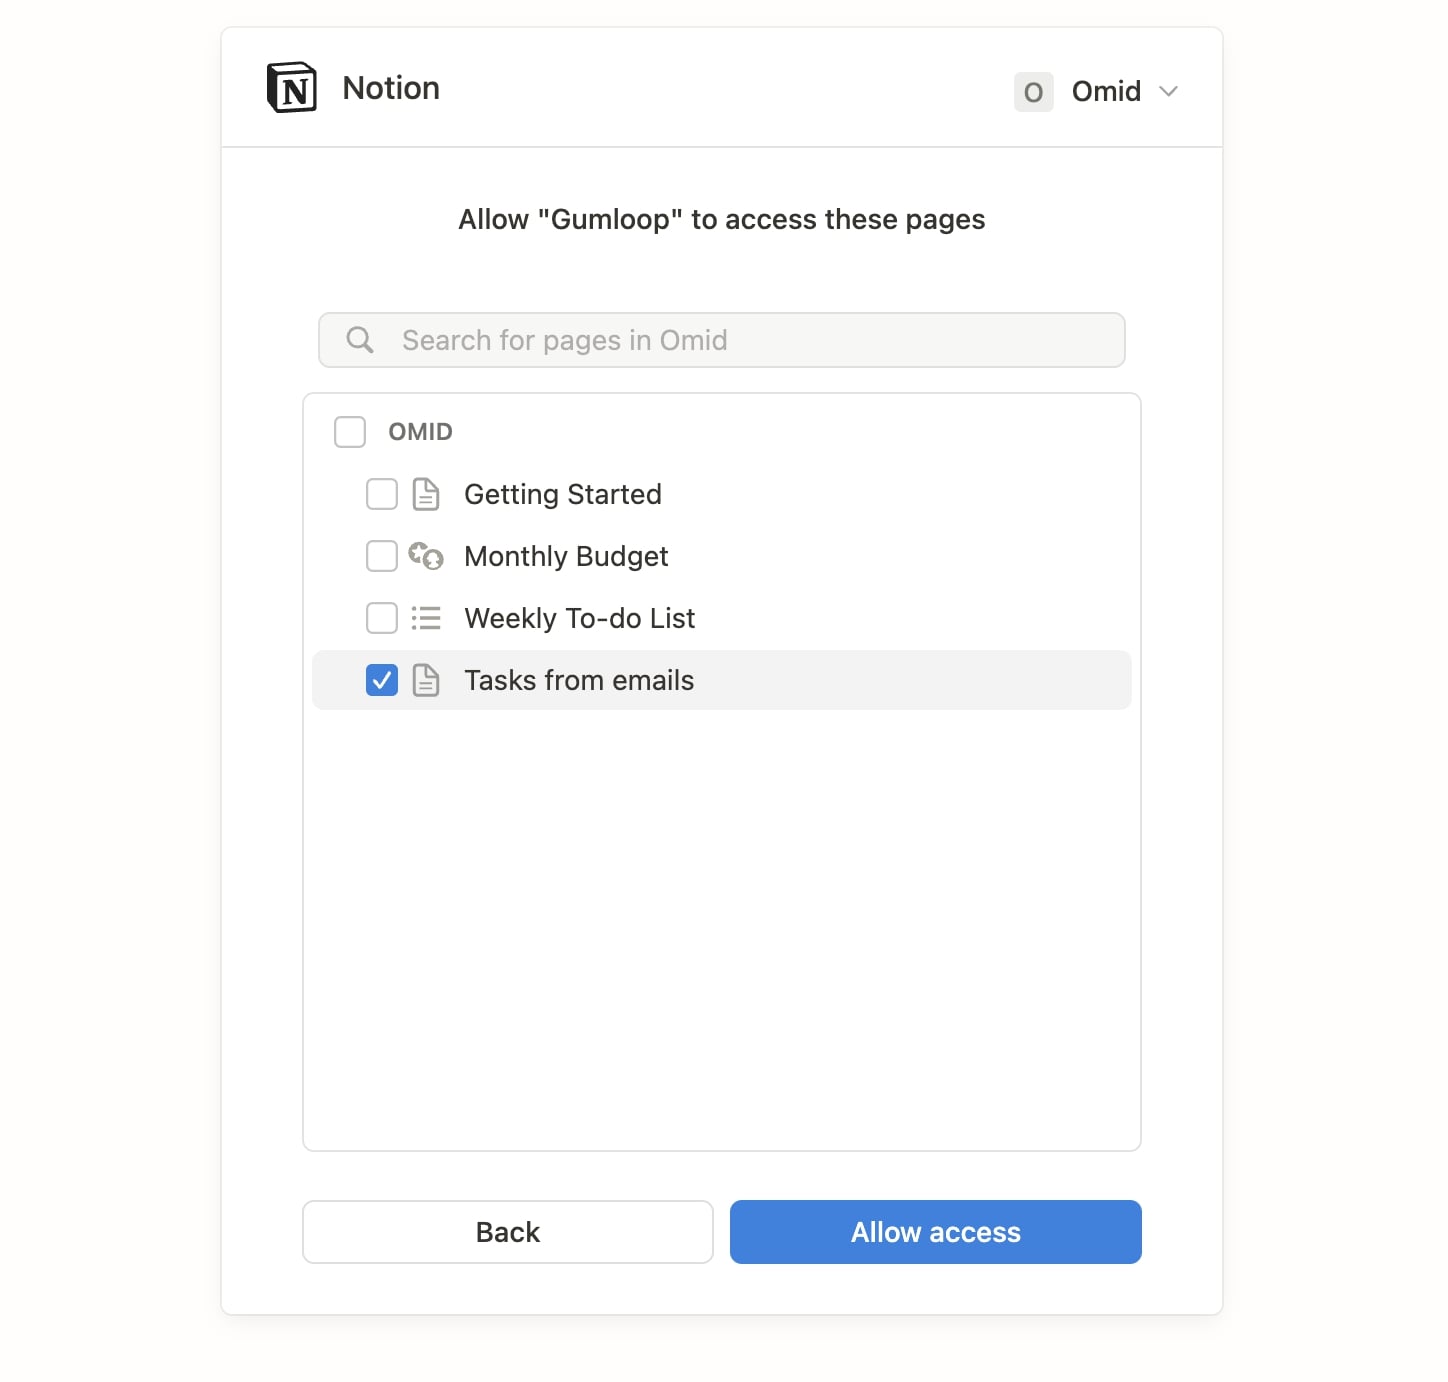
In this case, I created a database called “Tasks from emails” that I will use to integrate with Gumloop.

Now, any time I open the Notion Database Writer, I can go through the Databases I have given Gumloop access to, and when I click on one of them it shows the columns from my Notion Database. In this case, I have three columns — Task, Description, and Priority Level.
Okay, let’s create our workflow.
3. Create a workflow with Notion and ChatGPT
As a reminder, we are creating an automated workflow that takes a request from an email and automatically adds it to a Notion Database using ChatGPT.
Here’s how it’s going to work: Email comes in → ChatGPT reads the email and figures out the task and description → The task and description are then added to our Notion Database. With all of it being powered by Gumloop.
This means the first thing we need to do is add an email provider node to our Gumloop canvas. For this example, I’m going to use Gmail.
In a previous blog post on integrating ChatGPT with Google Docs, I showed how to send emails with Gumloop. But for this tutorial, we want Gumloop to read an existing email. For this we need to add the Gmail Reader node.
We’ll also need to know what types of emails are ones that require a task to be made. So for this, I created a label in Gmail called “To do.” This way, any time a task comes in, I can label it and set the trigger to create the automated task in Notion.
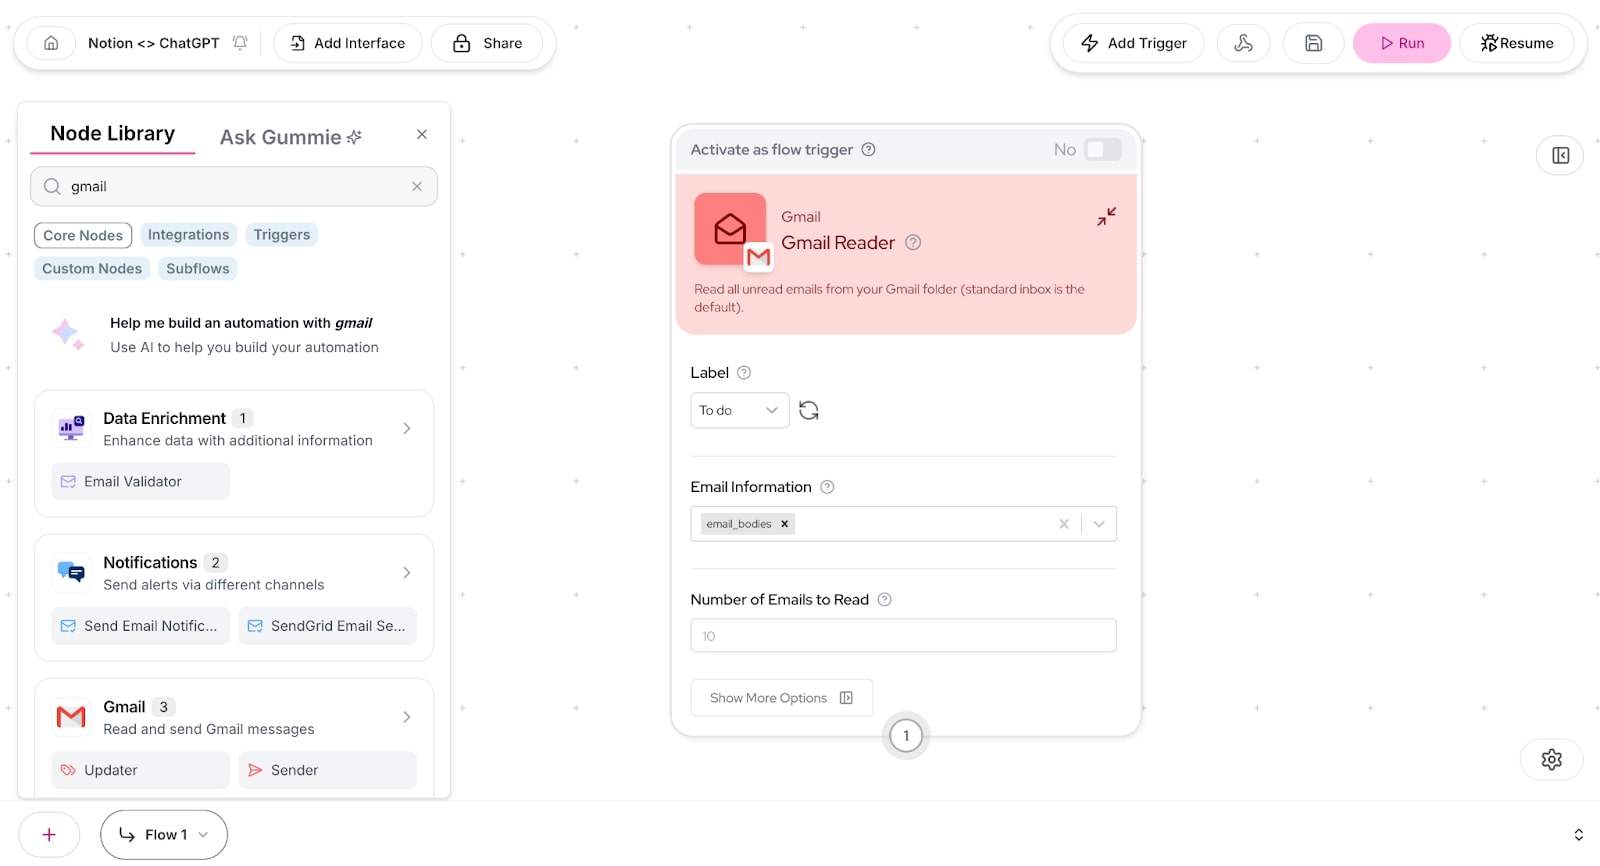
In the screenshot above, you can see that I have the Label set to the one I created in Gmail, To do, and I have also added email_bodies to the for the Email Information.
Now, we want to add ChatGPT functionality. But, because we are expecting to get multiple emails, as they come in and are labeled as “To do,” we need to add the Join List Items node so we can send the information accurately to ChatGPT.

In the screenshot above, we connected the Gmail Reader to a Join List Items node, dragged over the Email Bodies as the list input, and toggled “Join by Newline” to Yes (this separates each email as a new line for ChatGPT to read easily).
Now, we add the AI layer. For this, we are going to use the Ask AI node to use any model of ChatGPT (or really any LLM) that we want. Because we want to take emails and extract data from them, we need to use the Extract Data feature in the Ask AI node.
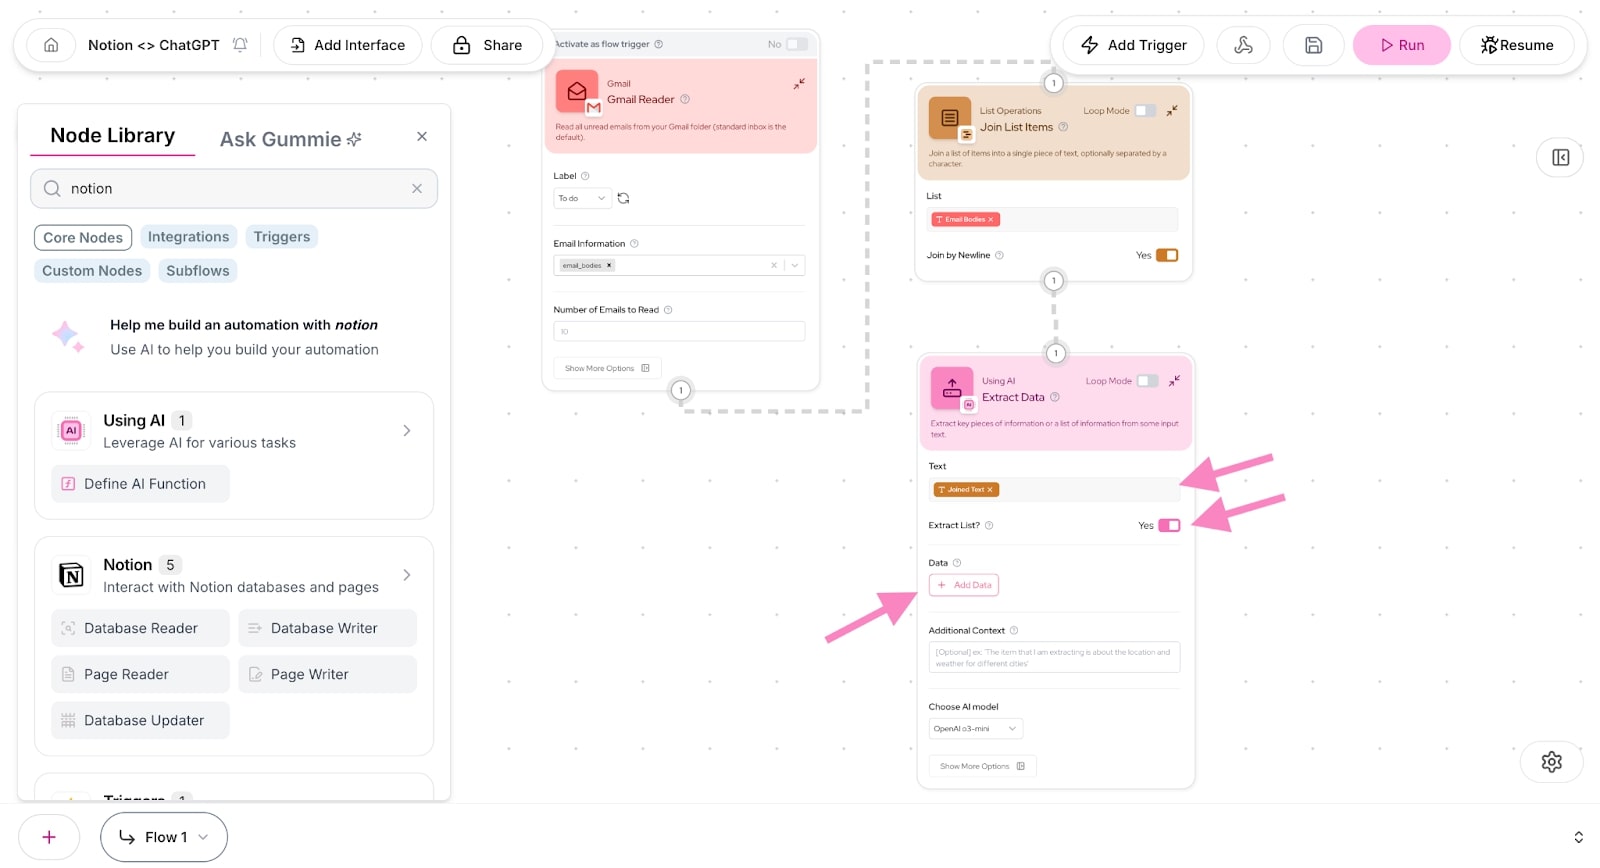
In the screenshot above, I connected the output of the Join List Items to our Extract Data node. From here, we want to add our joined text as the input for the Text. Then we want to toggle Yes for the Extract List. And then we need to Add Data. The Add Data part will reflect the columns in our Notion board — so we need three of these.
In Notion, I have three columns — Task, Description, and Priority Level. For each of these, I’m going to add the name of the column and the description of what it is.

The Extract Data node is very long now because of the three data sources we added. Now, we want to scroll down (staying in the Extract Data node) and give ChatGPT a prompt (in the Additional Context section).

In this case, I prompted ChatGPT to take the email and identify if there were any tasks or questions within the body copy. Then, it needs to extract the information and pick out each task with its own name, description, and priority level. For the model, I chose OpenAI o3-mini because it's a fast model.
Now, let’s connect our Notion Database Writer to take in the information from ChatGPT and input it into Notion.
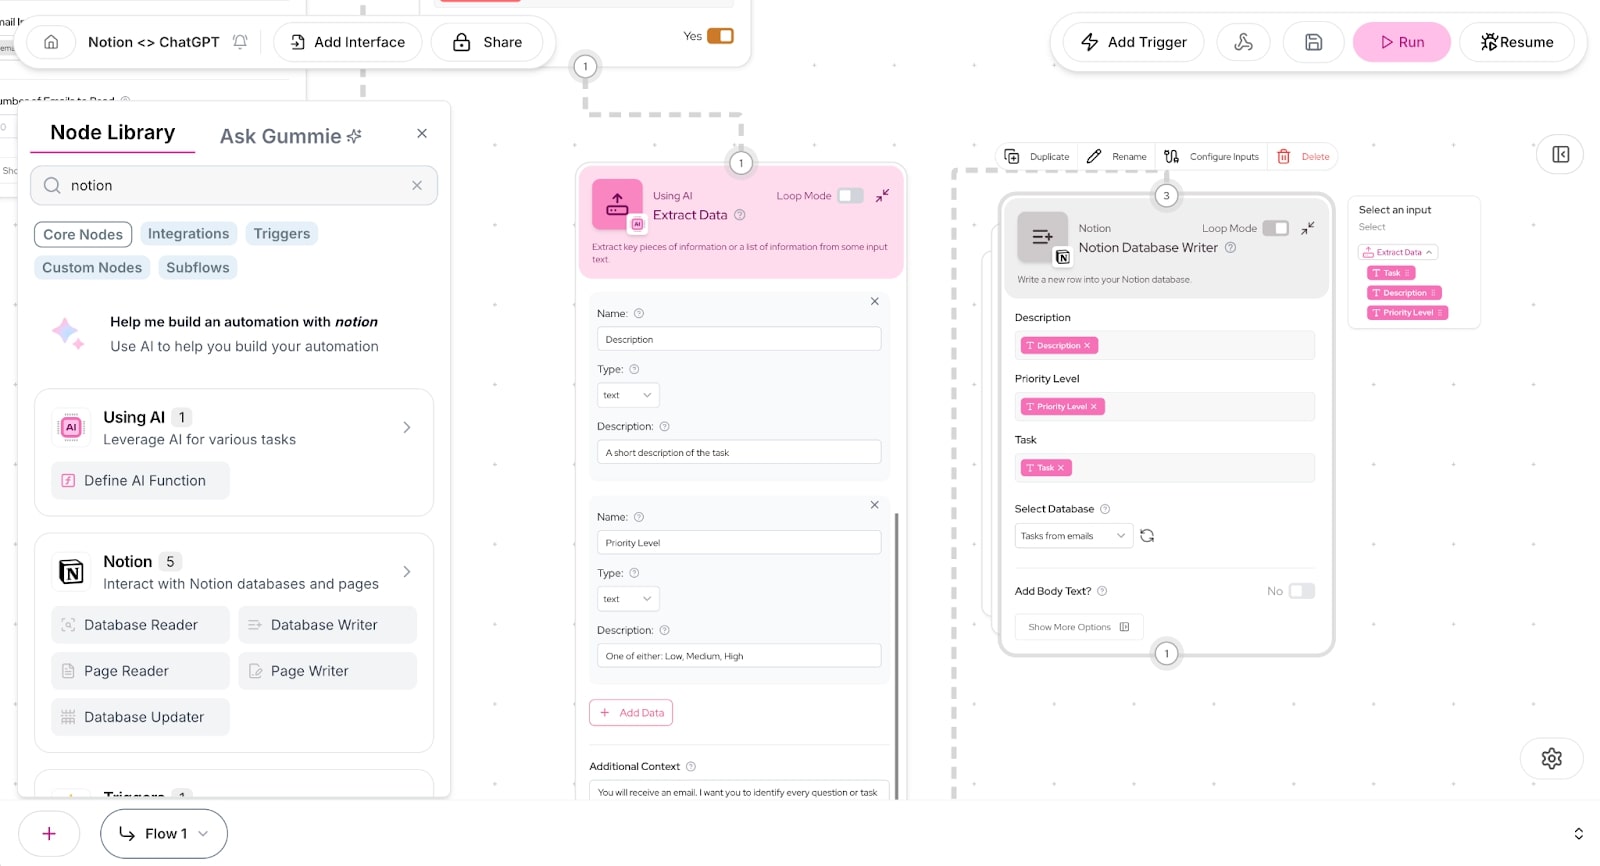
In the screenshot above, we mapped the outputs of the Extract Data node — Task, Description, and Priority Level — to the corresponding inputs in the Notion Database Writer.
Before I run the flow, let’s look at the Notion Database:
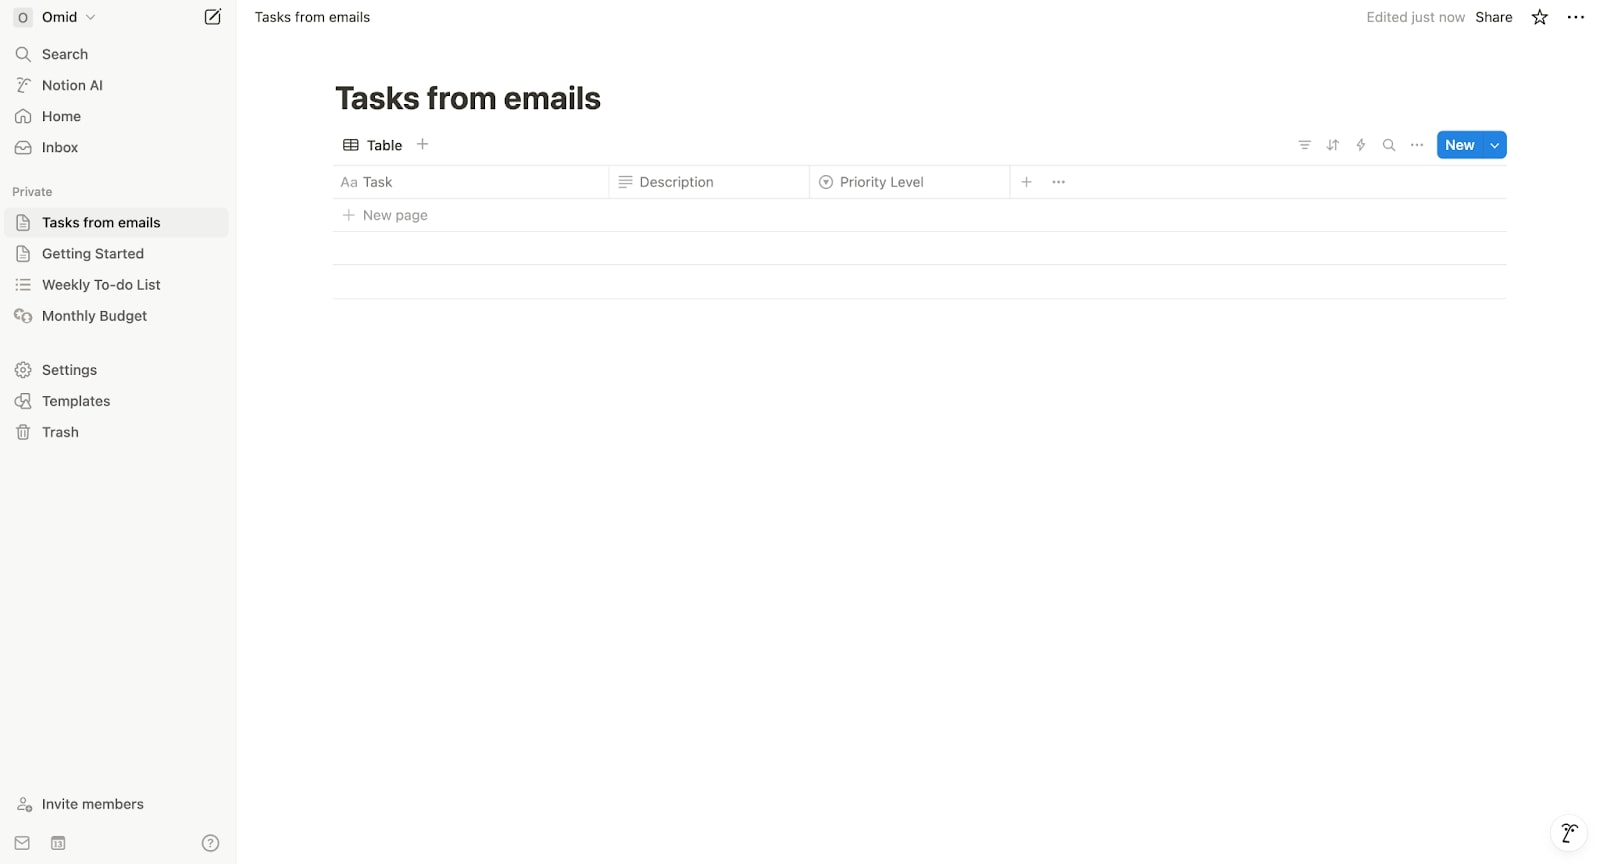
Empty. Okay, now let’s go to step four to run the Gumloop flow!
4. Test the integration
We are almost there. Before we run this flow, let me show you the email that was sent:

This email was added to the Labels tab. Now, let’s go back to Gumloop and run the flow:
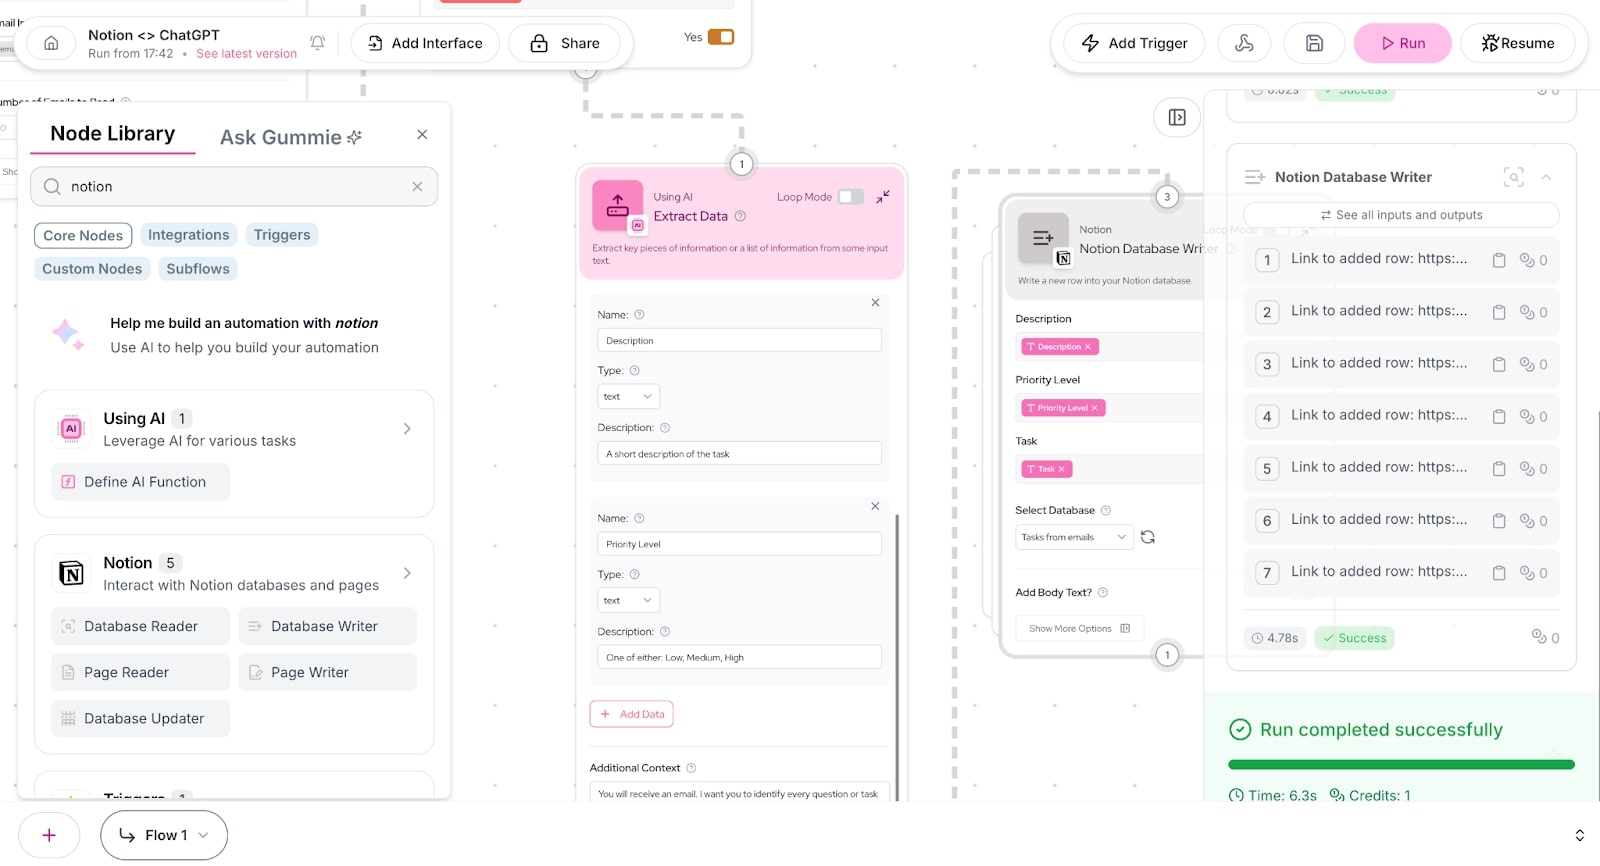
It looks like the flow ran successfully. Now let’s look at the Notion.

Tada! 🎉
Within seconds, 6.3 seconds to be exact, we created a Notion ChatGPT integration with Gumloop that read an email we received (and set a To Do label on), extracted the data in the email using ChatGPT, and automatically wrote us tasks in our Notion database.
Now you’re ready to create an automation with Notion and ChatGPT!
Automate more than just Notion
As you can see, there’s a lot you can do with Gumloop. We just went over creating automated tasks in Notion based on emails we received. But that is just the beginning.
Gumloop was built on the premise that if you can understand the task, you should be able to automate it. Whether you’re using Notion, Google Sheets, or any other tool, you can leverage LLMs to create automated workflows in Gumloop.
Start small with a simple automation like the one we went over, then expand as you become more comfortable with the platform. The no-code approach makes the platform accessible to everyone, regardless of technical background.
And if you’re looking for some inspiration on what else you can automate, go check out Gumloop templates.
Happy automating!

Read related articles
Check out more articles on the Gumloop blog.